Android 10 ought to have landed on most of your phones by currently and you almost certainly have an honest handle on all its options. One in every of the foremost necessary aspects of the software is its increased security and improved user management over permissions. You’ll fine-tune the knowledge apps access, prohibit location services supported usage, contain background app activity, and better of all, do all of this from one privacy hub in settings.
If you think that privacy might be a right, android are some things of a nightmare. the bulk who use Google services are conscious of the corporate is tracking their location, checking that websites they’re getting to, recording their voice, and reading their emails. What many individuals tend to forget is that android was developed by Google, and is one in every of the foremost necessary tools for this information assortment.
With cloud and new tech starting all the time, securing your privacy has become vital. One factor you need to grasp before we tend to leap in is that as long as you’re getting to use Google services, there is no sure-shot manner of securing your privacy. However, by following the subsequent pointers and modifying your privacy settings, you’ll secure yourself higher and don’t got to render your personal data to a hacker on a silver platter!
Table of Contents
Disable Location History and further Tracking
You may know that Google tracks and stores a history of all the places you’ve visited by default, accessible via Google Maps -> Your Timeline. While Google says it protects this data and doesn’t share it with third parties, you would possibly still be uncomfortable knowing the corporate features a complete diary of your every step (while carrying your phone). It’s possible to show off this location tracking altogether, but to try to so thoroughly, you would like to flip quite a few switches. That’s why we’ve published an entire other article on the difficulty. Check it out.
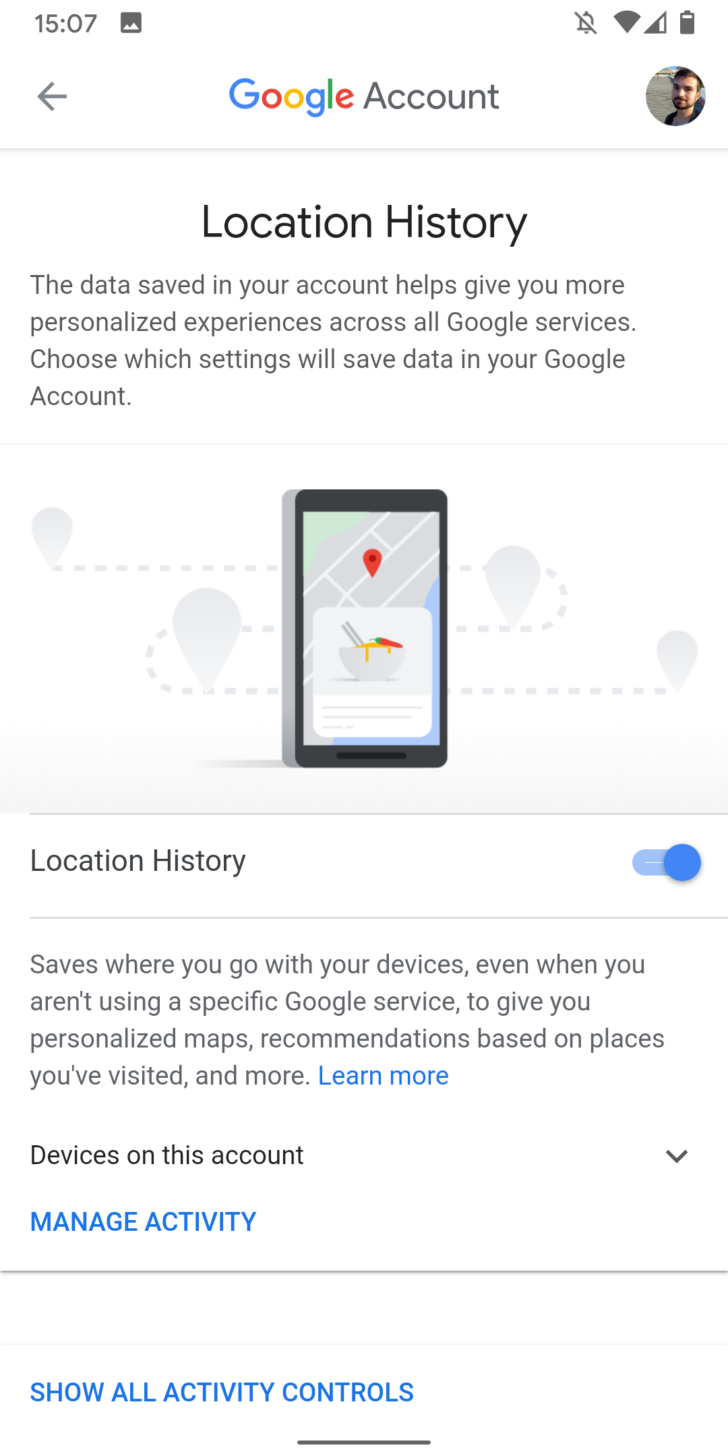
Keep in mind that turning off Location History comes with some disadvantages as well: Your timeline in Google Maps won’t update anymore, your Google Assistant will lose some capabilities, and your automatic commuting notifications will stop appearing.
Web and app activity
When this feature is turned on, Google tracks and compile your browsing activity on both its site and your local apps on your phone while you’re signed in to the apps. When it involves the online and therefore the Chrome browser, it keeps a reasonably thorough history of your searches, the sites you’ve visited, and your activities. If you’ve got an Android smartphone, it also saves the apps you’ve interacted recently, the precise time at which you probably did and the way repeatedly you used them throughout your day.
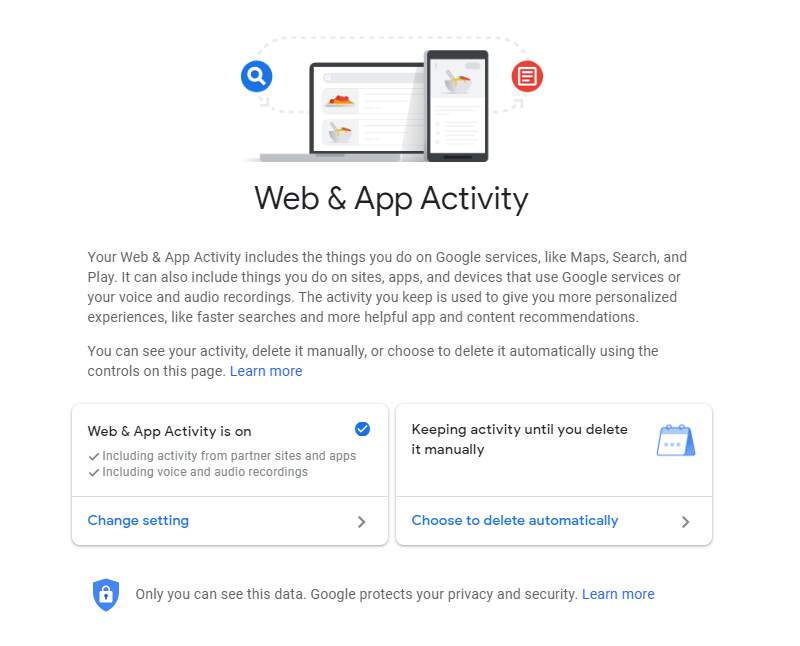
Google reasons that each one of these are often necessary for it to deliver a more specific and personalized experience to its users, including faster search results and smarter experiences when using its suite of apps. you’ll either turn it off altogether, which suggests Google won’t track any of your Chrome history (it doesn’t mean that your ISP won’t know what you browse, ISP always features a access to your activities), your activities, apps and devices and your voice and audio recordings. Moreover, you’ve got the choice to either delete it manually through settings or to possess it deleted automatically every 3 months or per annum and a half accordingly to your settings.
Google Play Protection
Until you (or someone else) voluntarily disabled it at any time, this first feature should be up and running on your Android phone already. Google Play Protect is Android’s security system that, among other things, constantly checks your phone for any signs of misbehaving and tracking apps and warns you if anything suspicious comes.
One can check that Google Play Protect is working fine on your device by seeing in the settings (or Security and Location) section of your system settings. Tap the line labeled “Google Play Protect,” then make sure all the toggles are activated and everything pops up as being active.

Opt out of Google’s personalizations.
To hinder Google to trace you round the web, head to your Google Account’s activity controls, accessible here and under Settings -> Google -> Manage your Google Account -> Manage your data & personalization.
There, you’ll close up Web and App Activity, but it’s important to notice that Google survey might subsided accurate once you turn this off. You’ll also stop Google from tracking data on your Google Assistant usage which severely restricts its usefulness. for instance, the Assistant won’t answer personal questions like “What’s on my calendar?” or “Read my messages” or”set a reminder” on any device, including Home speakers with google assistant — Google wants you to supply your data to continue using the Assistant precisely.
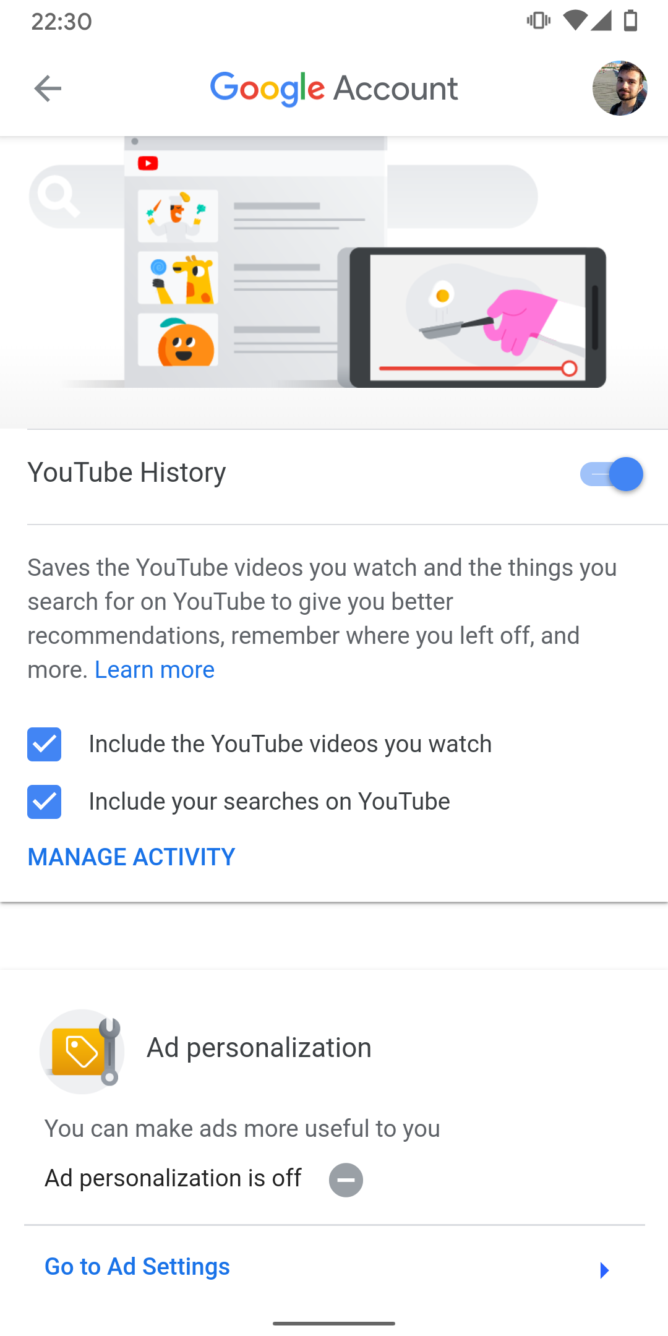
You can proceed by turning off YouTube History and, more importantly, Ad personalization, then your Google will stop showing personalized advertisements to you and can instead show you more general and fewer relevant content. consistent with Google policy, it’ll solely be supported “general factors, just like the items of what you are looking at, the time of day at that instant.
You’ll also get to attend myactivity.google.com to get rid of previously stored information. thereon website, open the menu and tap the three bars within the top left corner and choose “Delete activity by.” Then you’ll select which activity you want to get rid of.
On Android 10, all of those security settings are moved to an easily accessible one location in Settings -> Privacy. While you’re there, make certain to show off the subsequent, too:
Turn off Auto-fill service from Google.
Turn off Usage & Diagnostics.
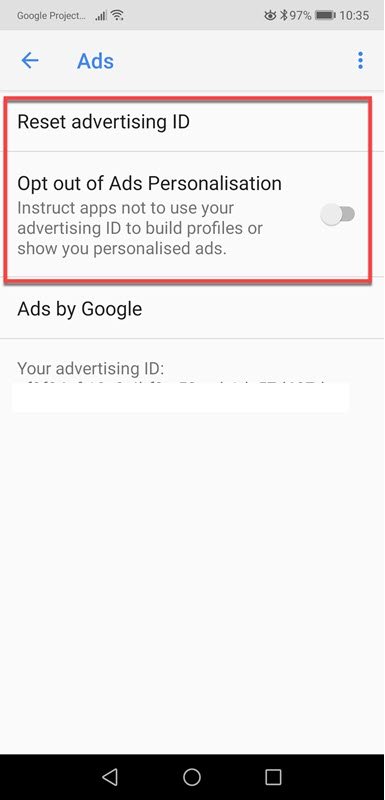
Ads Opt Out and Reset Ad Id
Google assigns every account an advertising ID and opts you into ad personalization. Opting out helps to stop apps from using your ID to track you and build profiles on you and showing you personalized ads which many people find these types of ads to be a bit uncomfortable and many find them a wrong unnecessary invasion of their privacy.
Resettling the advertising ID occasionally help to hinder collection and Tracking of your personal information for ad purposes.
To Opt Out and reset your Advertising ID:
Settings > Google Services > Ads
Find My Device
Find My Device is another of the Android options that’s both a handy feature and a privacy concern. If you misplace your device it can have the phone ring for five minutes while you are trying and locate it around the house or within the car. It also can allow you to seek out, lock, and erase the device remotely if you think that it’d been lost or stolen.
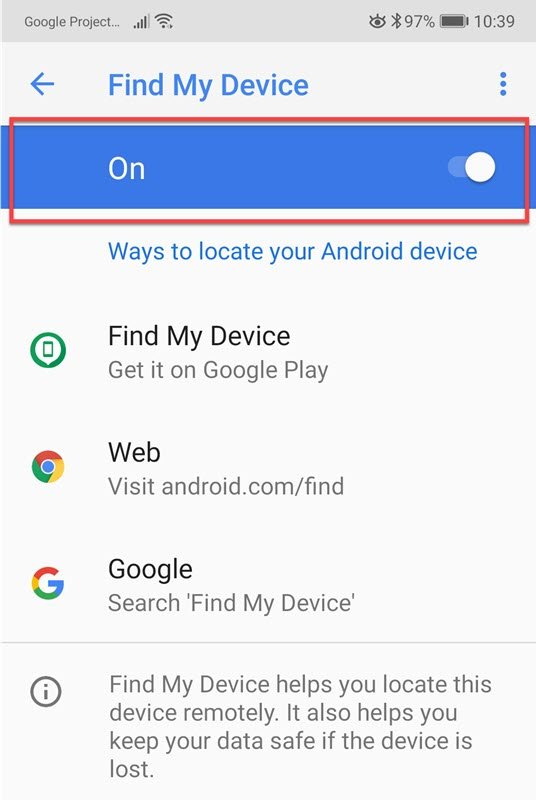
However, to try to to this it enables your device to repeatedly send your location information to Google. If that isn’t a concession you’re willing to form, you’ll close up this feature.
Settings > Security & Privacy > Find My Device
Emergency contact info
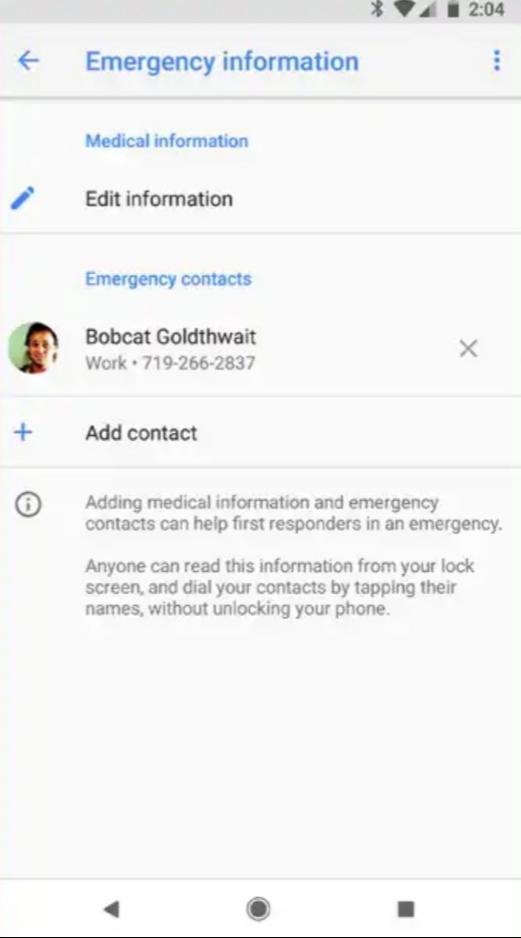
It gives people a way to do the right thing by adding an emergency contact that can be accessed and dialed with a few taps from your lock screen. Go to the Users and Accounts section of your system settings, then scroll down to “Emergency information.”
If you don’t see the option there, look instead under the System section of your phone’s settings. There tap “About phone” and then “Emergency information.”
Tap that option and follow the prompts to add an emergency contact — a close friend, family member,or whatever makes sense for you.
Android Security Settings: Emergency Contact
The only challenge is that the emergency contact info isn’t exactly obvious or easy to find on the lock screen — go figure — so anyone who picks up your phone may not even notice it.
But wait! you’ll increase the percentages significantly with one further step: Head into the safety section of your settings and tap “Lock screen preferences.” Yap the line tagged “Lock screen message” and enter one thing on the lines of: “If you’ve got found this phone, please swipe up then tap ‘Emergency’ and ‘Emergency Information’ to notify you!” (Hey, it will ne’er hurt to be polite.)
That message can then perpetually show informed your lock screen — and as another bonus, if there is ever associate degree actual emergency, you will be prepared for that, too.
Two-factor authentication
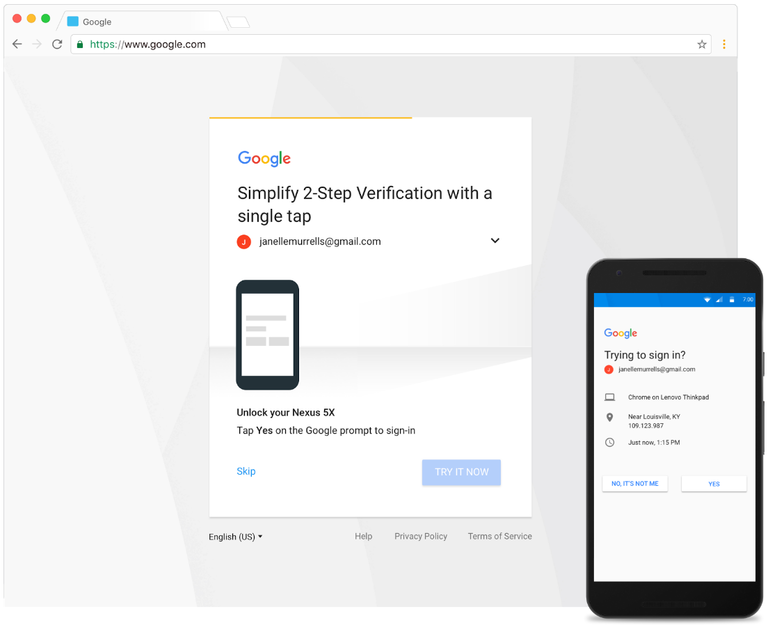
This is technically a Google account feature and not specific to Android, but it’s extremely much connected to Android and your overall smartphone security picture.
You know what two-factor authentication is by now, right? And you’re using it everywhere you’ll — especially on your Google account, which is perhaps related to all kinds of sensitive data?
If you are not, now’s the time to start out. Hustle over to the Google section of your phone’s system settings, tap “Google Account,” then scroll over to the “Security” tab. Tap “2-Step Verification” and follow the steps to line things up.
For most people, I’d recommend using the Google prompt because of the default method, followed by an authenticator app. For the latter, you will need to download and found out an app like Google’s own Authenticator or the more flexible Authy to get your sign-in codes.
It’ll add an additional step into your sign-in process, but this is often one area where the minor inconvenience is extremely much well worth the tradeoff for enhanced protection.
Screen pinning
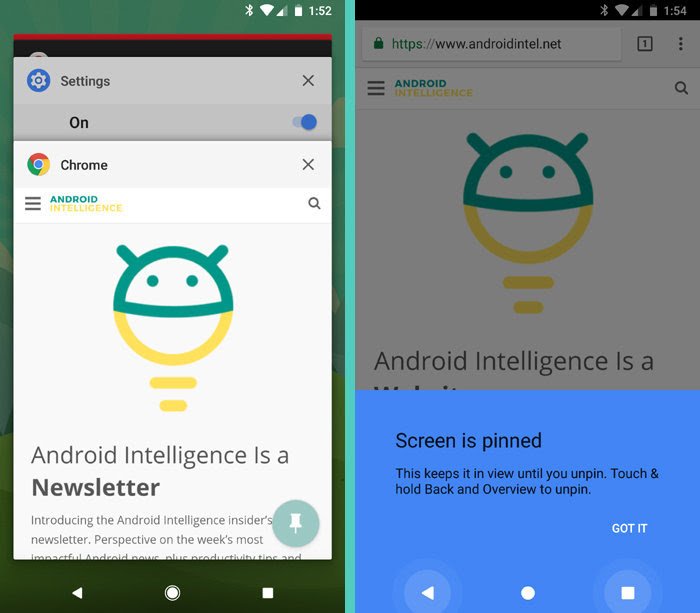
One of Android’s most practical security options is additionally one among its most hidden features. I’m talking about screen pinning — something introduced way back in 2014’s Lollipop era and infrequently mentioned since.
Screen pinning makes it enable you to lock one app or process to your phone then require a password or fingerprint authentication before anything is often accessed. It is often invaluable once you pass your phone off to a lover or colleague and need to make certain they do not accidentally (or maybe not so accidentally) get into something they shouldn’t.
To use screen pinning, you’ll first get to activate it by opening that trusty old’ Security section in your main system settings then finding the road labeled “Screen pinning.” (You’ll probably need to tap a line labeled “Advanced” to urge it) Turn the feature on and also confirm the toggle to “Ask for unlock pattern before unpinning” is activated.
Now, subsequent time you’re close to putting your phone in someone else’s hands, if your device is running Oreo or lower, first hit the Overview button — the square-shaped icon next to Back and residential — then push the on-screen cards up as high as they’ll go. Tap the pushpin icon within the bottom right corner of the lowermost card, and your last opened items will then be locked to your screen. Then, you will have to carry the rear and Overview keys altogether then unlock your device before anything is often accessed.
JRAndroid Security Settings: Screen Pinning
Starting with Android 9 Pie, things are a touch different: You’ll still begin by opening the Overview screen — either by pressing the square-shaped button or by swiping abreast of the pill-shaped button, if you’re using Google’s new gesture navigation system — on the other hand , you’ll tap on the icon above an app’s card and appearance for the “Pin” option there to lock that app to your screen. You’ll then hold the rear and residential keys together so as to unpin it and unlock your device.
Lockdown mode
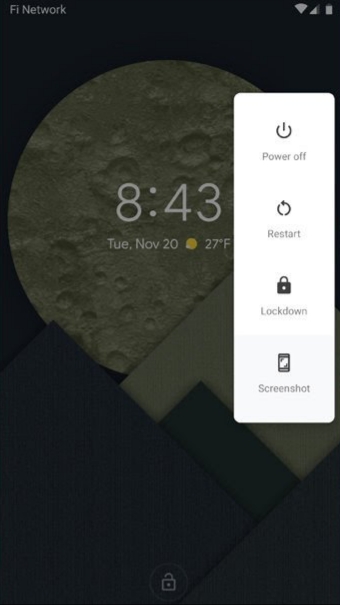
If you’re using Android 9 Pie, a replacement option called lockdown mode is worth your while to research. Once enabled, it provides an alternate thanks to lock down your phone from all biometric and Smart Lock security options — meaning only a pattern, PIN, or password can get you beyond your lock screen and into your device to access it.
The idea is that if you were ever during a situation where you thought you would possibly be forced to unlock your phone together with your fingerprint or face — you’ll activate the lockdown mode and know your data couldn’t be accessed without your explicit permission. Even notifications won’t show abreast of your lock screen when the mode is activated, which heightened level of protection will remain in situ until you manually unlock your phone (even if the device is restarted).
The trick, though, is that you simply need to enable the choice before time so as for it to be available. To do so, provided you’re using Pie, gallop back to the safety section of your system settings.
Tap “Lock screen preferences” then activate the toggle next to “Show lockdown option.”
While on your lock screen, press your phone’s power button for a couple of seconds. There you’ll find the choices for restarting and shutting down your device, you will see a replacement option labeled “Lockdown.”
JRAndroid Security Settings – Lockdown Mode
With any luck, you’ll never need it. But it is a good added layer of protection to possess available, just just in case — and now you recognize where it’s and the way to use it.
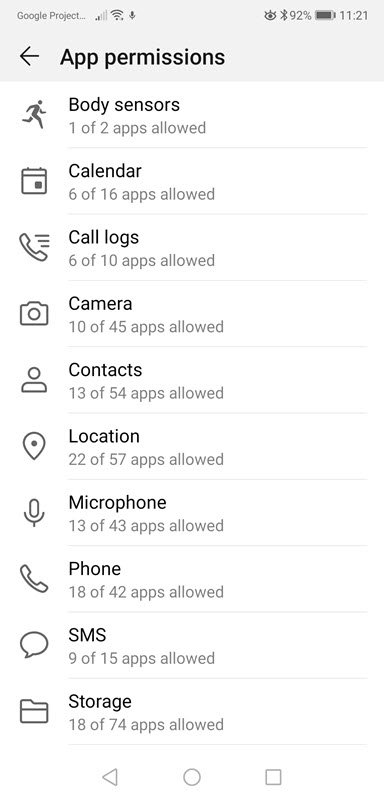
Review App Permissions
Spend a little time going through and limiting the permissions on your apps to make sure they don’t have access to data they don’t need. For example, a flashlight apps do not require access to your location data.
There are a couple ways to do this, by app or by permission. I find doing it by permission easier.
To view permissions by app: Settings > Apps > Apps
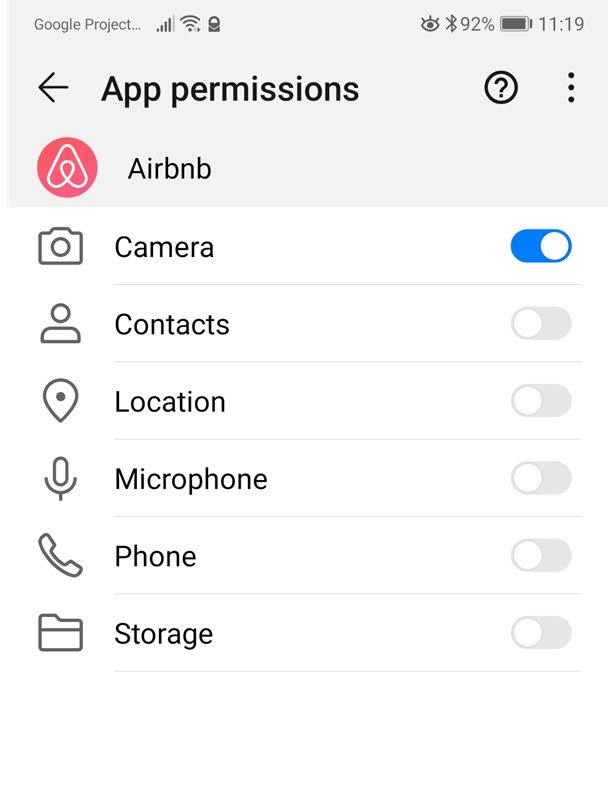
To view by permission: Settings > Apps > Permissions
Use A VPN
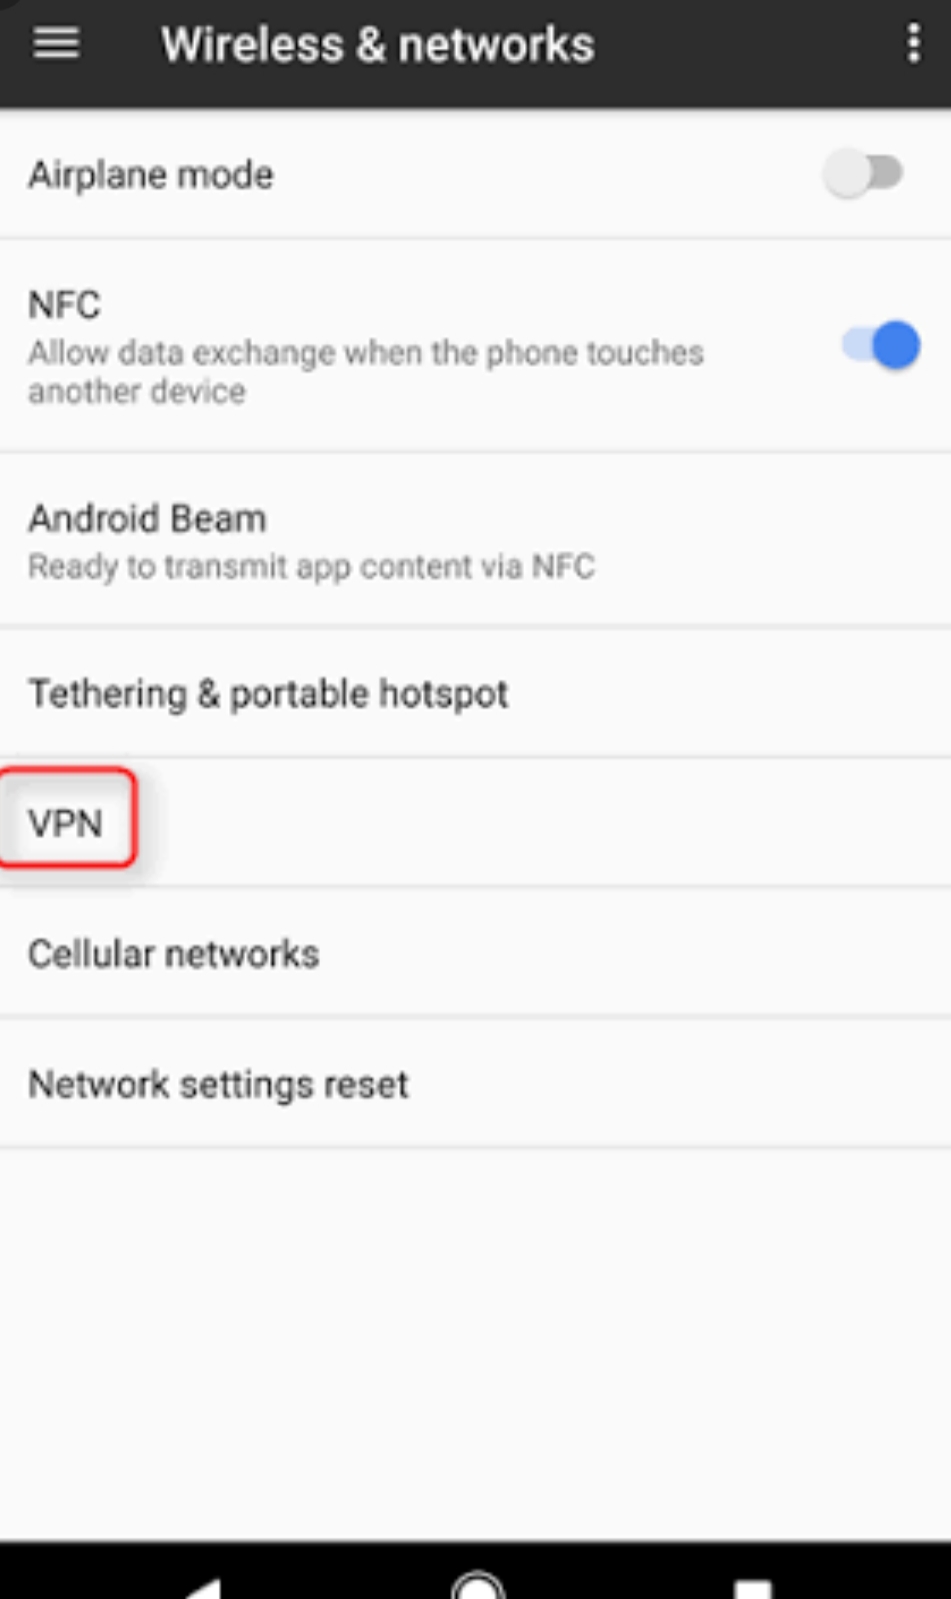
If you aren’t familiar with what a VPN is, it is a software application you install on your phone that creates an encrypted connection to the VPN companies server.
When it is combined with a privacy-centric browser and a search engine like Firefox and DuckDuckGo it helps to keep your internet activity away from the spying eyes of your ISP/Mobile phone carrier especially companies like Google.
Also Read: Is privatisation of ISRO the right call? | Tech2Stop